See here, here and here for Parts 1, 2 & 3
Einstein is often attributed with saying "Insanity is doing the same thing over and over again and expecting the same results". [Spoiler Alert: He didn't]. I had tried three times to get my Super Compost Bins up and running, albeit I was making small adjustments each time, but I was getting the same result every time. The compost was heating up but could not sustain temperatures within the hot composting range (40 -60 ℃). And all the while that pile of clematis stems was not getting any smaller.
 |
Photo 1: Less than half the clematis waste
|
- The first task was to take the Super Compost Bin apart and check for any obvious faults. None found.
- The next job was to rebuild the base. The Super Compost bin does not have its own base so I built one using bricks to support the bin itself and gravel grids for drainage/air ingress. Restricted air ingress is a key factor in successful no-turning hot composting. The gravel grid had filled up with compost (very fine compost, it must be said!) over the years so I dug this out before replacing the grids.
 |
| Photo 2: Super Compost Bin base |
- The bin was placed back on its ground base ready for the next stage.
 |
| Photo 3: Super Compost Bin on its Brick Base |
- On the outside base of the bin, I used bark chippings (2" deep) to cover the bricks and restrict air ingress (Photo 4). Another option might be to put a layer of felt (or similar) on the bricks to seal the gap between the base and the bricks. A short length of plastic tubing was inserted between the bricks and into the chamber beneath the gravel grid with the other end left exposed on the outside of the bin. This would allow a restricted supply of air into the base of the heap to encourage the composting process. The Super Compost Bin has worked successfully in the past without this modification so make be entirely superfluous.
 |
| Photo 4: Bark Seal at the Base and Air Ingress Tube |
- The final two steps in preparing the Super Compost Bin were to put a 1" (2.5 cm) layer of bark on the gravel grid (Photo 5) and then to cover the bark with a plastic mesh (Photo 6). This dual barrier is air permeable, insulating and, hopefully, will stop compost from falling into the gravel grid and clogging things up. Time will tell.
 |
| Photo 5: Bark covered base |
 |
| Photo 6: Plastic Grid on top of Bark |
- The Super Compost Bin was then half-filled with a mixture of hot (50-60 ℃) partially-composted material (PCM) from my HotBin, warm PCM from my other (failed) Super Compost Bin, and some dilute urea solution before adding a couple of hot water bottles and covering with a mat.
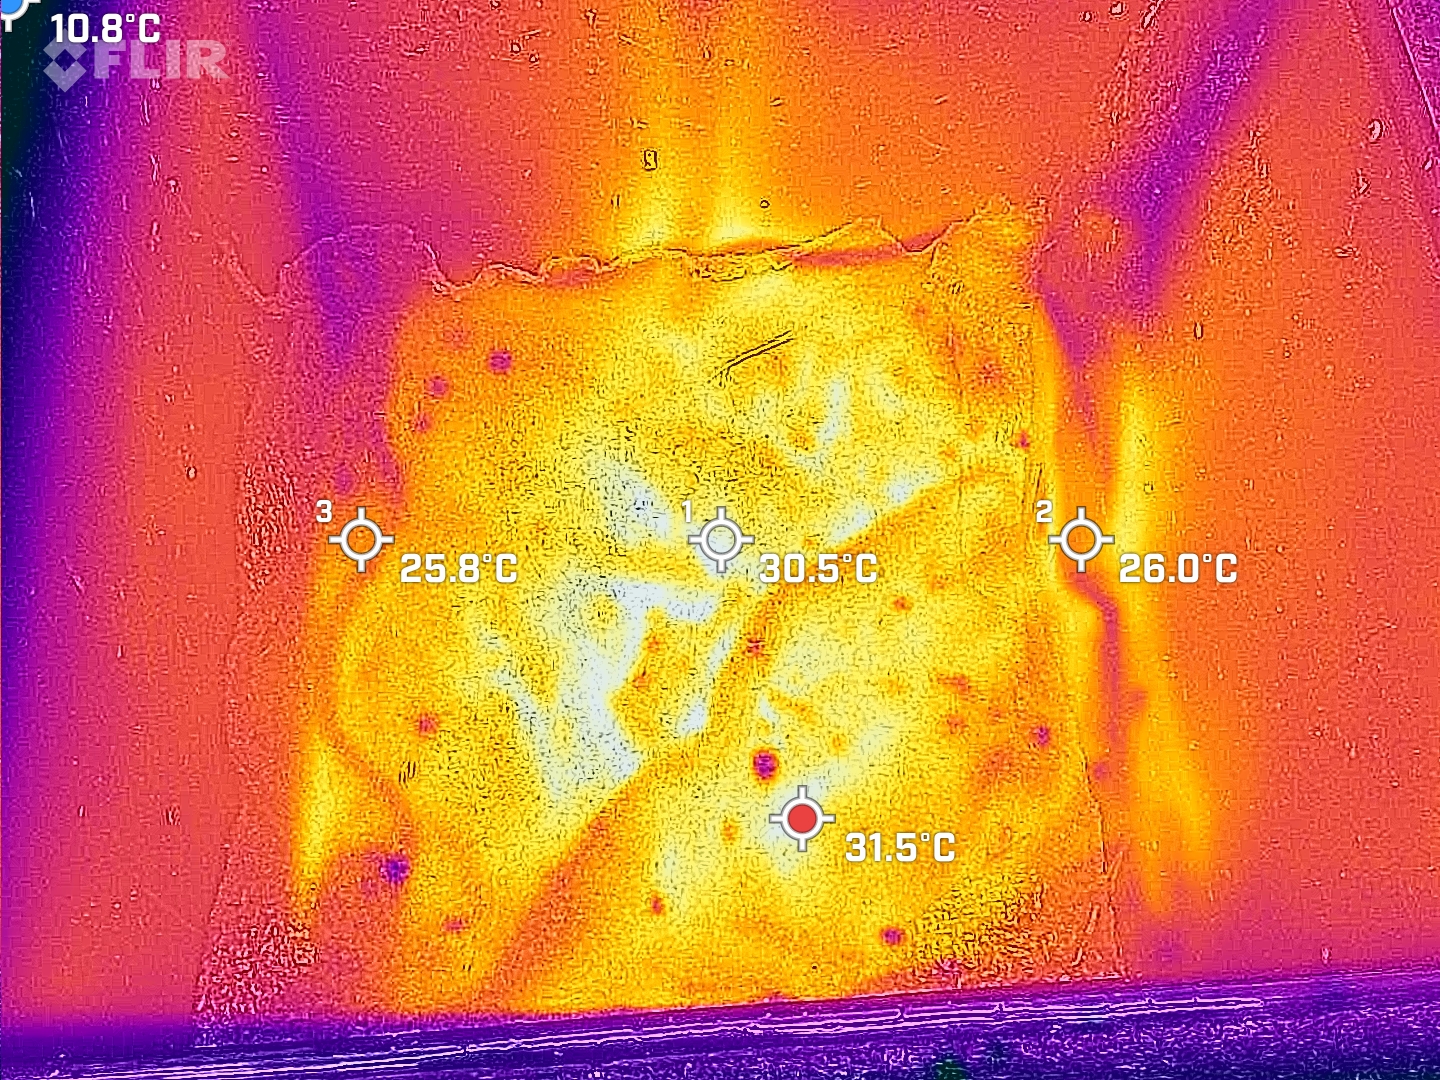
- The following day compost temperature readings were 28 ℃ and 32 ℃ at depths of 20 cm and 10 cm. So not great. Photo 7 is an infra-red heat signature photo of the Super Compost Bin innards taken with a FLIR One Pro Camera/Pixel 4a phone combination. Note the cold spots in the corners, indicative of heat leakage.
 |
| Photo 7: Infra Red Heat Signature of Super Compost Bin Innards |
Photos 8 - 10 show the infra-red photos of the front, right-hand-side and left-hand-side of the Super Compost Bin:
 |
| Photo 8: Heat Signature (Front of Super Compost Bin) |
 |
| Photo 9: Heat Signature (RHS of Super Compost Bin) |
 |
| Photo 10: Heat Signature (LHS of Super Compost Bin) |
- The infra-red photographs clearly show where heat is escaping: from the four corner joints and the junction between the lid and base.
- Composting is an aerobic process which is why you need to 'turn' a standard compost pile to encourage bacterial biodegradation. The HotBin and Super Compost Bin are designed to draw in fresh air at the base via the chimney effect (as hot air rises inside the bin, the air pressure drops so that the higher air pressure outside the bin forces fresh air in at the base). This removes the requirement to 'turn' the compost pile but means there must be an escape route for the rising hot air. Heat loss at the top of the bin is expected and necessary. Ideally, any heat loss should be at the top of the bin only; preferably with some sort of control to regulate the amount of hot air escaping.
- I suspect too much heat is escaping from the Super Compost Bin and this was preventing it from reaching and maintaining the temperatures (55 ℃ to 65 ℃) required for hot composting. The Super Compost Bin has worked without any problems in the past and nothing materially has changed.
- I thought I'd check out the heat signature of the HotBin composter which has been operating successfully over the winter. The previous day, I had used the hottest (65 ℃) PCM from the top of the HotBin to start another Super Compost Bin; consequently, the HotBin was still 'warming' up and had not reached its routine operating temperature. The probe thermometer was recording a temperature of 48 ℃ at a 10 cm depth when this infra-red photograph was taken (Photo 11).
 |
| Photo 11: Infra-red Heat Signature of HotBin Innards |
- The infra-red photograph of the HotBin, along with the maturation bins (cold compost) is shown below (Photo 12). The hotspot (indicated by the red dot, 8.5 ℃) is the Hotbin vent (see Photo 13) and there are no obvious heat leakages from the HotBin.
 |
| Photo 12: Infra-Red Photograph of HotBin and Maturation Bins (24/3/23) |
 |
| Photo 13: HotBin Vent Hotspot |
- This sideways on view of the HotBin demonstrates the absence of any cold spots/heat leakages from the main body or the lid/base seal.
 |
| Photo 14: Infra-Red Photograph of HotBin (24/3/23) |
- So the next step will be to see if we can eliminate the cold spots found on the Super Compost Bins.
... to be continued.


0 comments:
Post a Comment