Fruit-Picking Season Starts Now


Cherries, Blackcurrants and Gooseberries

The fruit-picking season in the kitchen garden has started in earnest. Yes, we have been enjoying some strawberries and raspberries up to now, but this is when it starts to get serious. 

Yesterday (26th June), I picked the Stella cherries (before the blackbirds and starlings got to them first) along Ebony blackcurrants and Whinham's Industry dessert gooseberries. The cherries were deliciously sweet with afternoon tea while the gooseberries were plenty sweet enough to eat raw with my muesli breakfast. Ebony blackcurrants are known for their sweetness and can also be eaten raw without that 'taking the roof off your mouth' sensation.

Today, I had a walk round the garden to see how the fruit trees and bushes were doing. The Concorde and Comice pears are swelling up nicely and should produce a reasonable crop - though possibly not as good as last year for the Concorde pears...

Concorde Pears

Comice Pears

Most of the apple trees are fairly new and still settling in; these are the Supercolumns bought from Chris Bowers a few years back. There will be few apples from the Red Windsor and Red Falstaff varieties...

Red Windsor Apples

Red Falstaff Apples

If you have to choose between growing pears or apples, then I would recommend pears because they are more productive, easier to grow and suffer far fewer pests and diseases. Should you decide you really do want to grow apples, then I strongly recommend Red Windsor - great taste and heavy crops. Modern varieties are usually more resistant to diseases so I would always plump for those if you can find one or more that you enjoy eating.

In a separate part of the garden, we also have Reverend W Wilks and Golden Delicious apple trees which are a 10-20 years old. The former only crops every other year (and this year is not that year!) while the latter had a bumper crop last year and seems to be in recovery mode this year with just a few fruits...

Golden Delicious Apple

Next to the Reverend W Wilks is our Nottingham Medlar tree showing a few fruits...

Nottingham Medlar Fruit

We used to have a couple of very productive redcurrant bushes but lost one to honey fungus in 2021. The remaining bush has flowered well and the currants are just starting to ripen...

Redcurrant fruit

 Our three Blueberry bushes are not great croppers, like the currants, though that may be down to my lack of proper care. I'm not a great fan, personally, as they are a bit lacking tastewise, but they are nutritious.

That just leaves the thornless blackberry and rhubarb growing along or next to a north-facing wall. The Livingstone rhubarb was only planted last autumn (2021), replacing a previously very productive but overlarge plant showing signs of rot, so we will not be harvesting any stalks this year. And I know, rhubarb is technically a vegetable, not a fruit!

Livingstone Rhubarb

Thornless Blackberry


The Underrated Radish

Harvesting radishes from my Salad/Veg Planter, I came across this whopper weighing 133 g...

Scarlet Globe Radish - Size XL


...the empty 1 lb (450g) peanut butter jar gives a visual indication of size.

The radish is probably the easiest vegetable to grow - the seeds are easy to handle and the plant grows quickly. It is widely used as a catch crop maturing quickly between slower-growing vegetables. Seed packets contain hundreds, if not thousands, of seeds and remain viable for many years. They are ideal for successional sowing for a long harvesting season.

High in vitamins and essential minerals & a good source of fibre, they can be eaten raw or cooked and will spice up any dish. There is a wide choice of radish-types so just find one you like and sow little and often. Scarlet Globe and French Breakfast are both excellent. 


View from the Rear Window - May 2022

May is the last month of meteorological Spring. As the weather warms and the danger of frost recedes, the transition from Spring to Summer unfolds before us. The vibrant colour of Spring (daffodils, tulips, etc) has been replaced by the subtle greens of fresh new growth as the plants prepare for their Summer show. There are splashes of colour, of course, from wisteria early in the month and roses towards the end of May.

May 2nd

May 17th

May 31st

As far as the kitchen garden is concerned, May signals warmer days and nights, especially the latter, with a much lower probability of frost. Sowing seeds between January and April is done with the knowledge that artificial heat and frost protection may be required. In May, the soil may have warmed enough to sow directly (sweetcorn, beetroot, runner and French beans, etc) and/or plant out tender vegetables raised with heat (courgette, cucumber, squash, etc). There is always a risk of frost 'stopping' or, even, killing off your outside plants but, also, the promise of early harvests.

Jobs in the Garden

1. Quadgrow preparation and planting of tomatoes & cucumbers in polytunnel

2. Harvest asparagus (50 spears)

3. Plant up new bog garden

4. Plant our squashes & courgettes

5. Plant out celery and celeriac in Salad/Veg Planters

6. Aubergines, Jalopeno and Sweet Peppers planted up in polytunnel

7. Succession sowing French beans, sweetcorn, mangetout, beetroot, parsnip

8. Plant out bought-in broad beans

9. Sow chard and perpetual spinach directly into soil

10. Start picking strawberries

11. Second and final application of Nemaslug

12. Calabrese & cauliflower seedlings moved outside to harden off

13. Hedge cutting, compost-making, irrigation


May 2022 Weather

Weather parameters for May 2022 are summarised in the table below. Overall, a reasonably sunny month with moderate rainfall. The development of the garden benefitted from the absence of frost and night temperatures of 6 ℃ or above. A generally quiet month of average weather!

May 2022

Weather Parameter

Value

Dates

Average Monthly Temperature 

14 oC


Maximum Monthly Temperature

24 oC

17th

Minimum Monthly Temperature

6 oC

12th, 28th, 30th

Number of Air Frost Days

0


Number of Hot Days (> 25 oC)

0


Monthly Precipitation

58.6 mm


Greatest 24 h Precipitation

22.4 mm

15th - 16th

Number of Dry Days

17


Monthly Sunshine Hours (estimated)

191


Average Wind Speed

3 km/h


Highest Wind Speed

37 km/h

20th

Maximum Barometric Pressure (Sea Level)

1029.6 hPa

8th

Minimum Barometric Pressure (Sea Level)

1000.8 hPa

23rd

Average Barometric Pressure (Sea Level)

1017.9 hPa


Daily minimum/maximum temperatures for May 2022 are shown in the bargraph below [click for larger image]. Day and night temperatures remained fairly constant throughout the month with no 'hot' or 'cold' periods.


Daily rainfall and solar radiation values for May 2022 are shown in the next plot [click for larger image]. It rained at regular intervals though in small amounts. The beginning of the month was cooler and cloudy but warmed through the month with a mix of sunshine and clouds.


Reviewing weather data from the last 3 years, the importance of the higher night time temperatures of May 2022 to the overall feeling of warmth in May 2022 is clearly seen. Generally, an average month with regards basic weather values.


The Met Office review of May 2022 was a warm month (5th warmest on record) due, in large part, to high overnight temperatures. Using the period 1991-2020 as a base, May 2022 in Herefordshire was warmer, cloudier and drier.

Some photos of the garden:

Bluebells in early May


White Ermine Moth (4th May)

Paradise Garden (3rd May)

Wisteria in full bloom in early May 2022

Scarlet Tiger Moth

Bog Garden (28/5/22)

Cape marguerite (Osteospermum)

Quadgrow Self-Watering System - Part 2 (Set-up)


Polytunnel - 3rd August 2021


In the kitchen garden, I have a 3m x 4m polytunnel supplied and erected by Haygrove in Spring 2011; this will be its 12th growing season.

I used a mix of direct soil planting and growbags for the first four growing seasons but then switched to the Quadgrow self-watering system, pioneered by Greenhouse Sensation, for the 2015 season. It started with a couple of Quadgrows and has gradually developed over the years to include both medium and large Salad/Veg Planters as well.

I had wanted to convert to a hydroponic (soil-less) system such as the Vivogrow but I didn't have a power source in the polytunnel so opted for the cheaper self-watering system. Solar-powered hydroponic systems have since become available, but I was already invested in the Quadgrows.

Currently, the polytunnel is set up with four 4-Pot Quadgrows for tomatoes and cucumbers, two medium Salad/Veg Planters for aubergines and chilli peppers, and three large Salad/Veg Planters (one for sweet peppers, one for all the 'straggler' plants left over after the best ones have been potted-on while the third planter is part of a new compost trial for one of my suppliers). This year I have decided to grow salad leaves, lettuces and radishes in outside Salad/Veg Planters rather than in the polytunnel as I normally do. In addition, I am also growing celery and celeriac in three large Salad/Veg Planters (outside) and, of course, the new Bog Garden is in a medium Salad/Veg Planter.

The Quadgrow self-watering system comprises a bottom reservoir (for the aqueous nutrient solution) on which sit four 12-litre pots that hold the growing medium. Connecting the reservoir and growing pots is a length of capillary matting that draws the nutrient solution up into the growing medium.

At the beginning of May, I set up the 4-pot Quadgrows as follows:

Step 1: Place the reservoir base in position using a spirit level to ensure it is level

Step 2: Fill reservoir with nutrient solution

Step 3: Add the reservoir cover and place the 12-litre pots in position

Step 4: Prewet the supplied capillary mats and feed through the holes in the bottom of the pots so that most of the matting is in the nutrient solution

Step 5: Prepare the growing medium. I use a coir-based medium mixed with perlite but there are plenty of other options. The growing medium does not need to contain plant nutrients as these will be supplied via the reservoir. Low-nutrient seed compost is fine but I prefer to make my own. I buy 5 kg organic coir bales (£9) and 100 litre bags of perlite (£30) from Fertile Fibre, a local Herefordshire company. After rehydration, each 5 kg coir bale makes about 80 litres of growing media which is mixed 4:1 by volume with perlite: cost about £15 for 100 litres. 

(i)    Put coir block in a large trug/bucket, fill with water and go & find something else to do for 15 minutes...

Rehydrating 5 kg Coir Bale


(ii) Repeat two or three times until the coir bale is sufficiently hydrated and swollen to enable segments to be broken off with your hands (an old screwdriver is useful for separating the layers)...

Partially Rehydrated Coir Block 

(iii) In a separate container, add more water to the broken-off segments and leave for 30 mins to an hour for the coir to rehydrate fully. Rub the coir between your hands to ensure it is evenly rehydrated and there are no dry portions.

Broken off Segments ready for Final Rehydration Stage


[Note: Any fibrous parts (long strands or clumps) that do not hydrate properly can be removed (for seed compost) or just left in for potting compost. A soil sieve is useful for removing any strands or clumps if you need to - just run the rehydrated coir through the sieve]

(iv) Measure 8 litres of rehydrated coir into a trug or similar container and add 2 litres of perlite...

Rehydrated Coir & Perlite Before Mixing

...before mixing well by hand (I usually wear gloves)...

4:1 Mix of Rehydrated Coir and Perlite

Step 6: Pull the well-soaked capillary mats partially out of the reservoirs and fill the pots with the prepared (or bought) compost. A small part (2-3 cm) of the capillary matting should stick up above the compost in a corner of the pot...

Filling Quadgrows with Compost - end of capillary matting just above the surface


Step 7: Leave overnight to settle and add plants the next day!

Quadgrow planted up with Tomato (x3) and Cucumber


If cold weather or cool nights are forecast then add a Quadgrow 'mini-greenhouse'. Once the plants are big enough, add a mulch cap to reduce surface water evaporation and restrict algal/weed growth.

A month later, the plants are settled in and starting to put on strong growth despite May being on the cool side. The cucumbers really need warmth to bring them on so my specimen, in the right-hand corner, is yet to start its rapid growth phase. Nevertheless, a few days later we were enjoying our first cucumber of the 2022 season.
Plants settling in

Tomatoes and cucumbers will need support. The current Quadgrow system (post 2018) comes with built-in cane support, which my older units do not have.  So I build a framework out of aluminium poles bound with flexible tie. The flexible ties are reuseable - some of mine are in their 10th year of use.

As you can see from the photo, I have installed a holiday watering kit - the 100-litre water butt feeds two 4-pot Quadgrows.

100L Water Butt feeds Two 4-pot Quadgrows

Simply fill the water butt with the nutrient solution and you can leave the plants for between one week and four weeks depending on the temperature and size/development of the plants (e.g. cucumbers need a lot of water to swell up and ripen but relatively little during their early growing stage).

I use the Nutrigrow plant food sold by Greenhouse Sensation - specifically, the refill packs...

Nutrigrow Refill Packs

Every Quadgrow bought from Greenhouse Sensation comes with enough Nutrigrow for the first growing season. Keep the original plastic bottles so that you can refill them, using refill packs, for subsequent growing seasons. 

The nutrients come in two formulas (A and B) that are mixed to provide the correct nutrient balance for the Quadgrow system. Each refill pack (250 g) is made up to 2.5 litres with tap water in the original bottle. Using a 100 ml plastic syringe, I add 60 ml each of the A & B solutions to a 10 L watering can and fill with tap water. Pour into Quadgrow reservoirs or water butt if you have the holiday kit.


Nutrigrow A & B Nutrients


Regrettably, Nutrigrow is not an organic fertilizer which would be my preferred choice - I understand the reason is that soluble organic fertilizers (based on seaweed extract?) start to decompose and smell after about 24 hours so are not really suitable for the Quadgrow system. Approximately 50% of the world's population is fed because of artificial fertilizers so I comfort myself in the knowledge that (i) these inorganic fertilizers are a necessity to feed the world, and (ii) I am also using them in a the most efficient way - just enough to grow my plants and none of it escapes into the environment.


QuadGrow Self-Watering System - Part 1 (Introduction)


Quadgrow Self-Watering System

The Quadgrow Self-Watering System, supplied by Greenhouse Sensation, comprises three components - a reservoir for holding the aqueous plant-nutrient solution, a pot containing the growing medium (and the plant, obviously!), and a capillary wick connecting these two elements.

The Quadgrow System could be considered a halfway house between conventional soil-based horticulture and hydroponics. While still using a growing medium akin to soil, it employs dilute water-soluble nutrient solutions to constantly feed and hydrate the growing plants.

In terms of efficient water and nutrient use and maximum product yields, hydroponics is the preferred system. It is more expensive to set up and requires specialized techniques for preparing the plants (germination and growing without soil) albeit with the promise of greater yields and fewer pests. Compared with conventional soil-based horticulture, the Quadgrow system offers improved yields, fewer pests/diseases, and more efficient use of water/fertilizer without the need for the specialized plant preparation techniques required in hydroponics.

For the amateur gardener, a Quadgrow Self-Watering System offers a number of benefits compared with conventional soil-based horticulture:

(i) less frequent watering (leaving more time for other things and guaranteed holiday watering)
(ii) more consistent watering (reduced tomato split/cracking)
(iii) plants are watered from the base reducing the likelihood of bacterial canker & fungal diseases
(iv) regular/consistent feeding (fewer problems such as blossom end rot)
(v) optimized nutrient supply for plant development, flowering, fruit set, etc (better yields, healthier plants)
(vi) improved root development (healthier more vigorous plants)
(vii) use of commercial compost media (instead of garden soil) reduces pest/disease problems and avoids the need for crop rotation
(viii) significantly higher fruit/vegetable yields (expect at least double)

Accessories for the Quadgrow include:

(i) pot lids/mulch caps (see photo above) to reduce evaporation from soil and lengthen times between reservoir top-ups; the lids also have holes to hold canes to build your own plant support system
(ii) a holiday watering kit comprising 80L water butt, ballcock valve for the reservoir to maintain constant water/nutrient level plus associated tubing and connectors (see above photo) - go on holiday for a week/fortnight without worrying whether your plants will be dead when you get back!
(iii) clear plastic domes/greenhouses for extra frost protection (also useful in the garden for protecting single plants) - see picture below:

Quadgrow 'Greenhouse'

(iv) solar conversion kits to move even closer to that hydroponic future - not for me as I'm already fully invested in the older incompatible kit


Greenhouse Sensation also do a range of Salad/Vegetable Planters that work on the same principle - water/nutrient reservoir, planter with 'soil' & plants, and connecting wicks.

Standard Salad/Veg Planter

 They come in two sizes: standard/medium (55 cm (L) x 55 cm (W) x 25 cm (H)) and large (105 cm (L) x 55 cm (W) x 25 cm (D) - note the depth measurement includes the resevoir; soil depth is 15 cm. Accessories include modular greenhouse sections (with adjustable ventilation) and lid (also with adjustable ventilation). Unfortunately, there is no 'holiday kit' to extend the times between reservoir top-ups.

I grow salad leaves, radish, lettuce, pak choi, celery, celeriac, chilli peppers, sweet peppers, aubergines and more in these planters both outside and in the polytunnel. Not to mention the bog garden!

I have found that sweet & chilli peppers and aubergines grow better in the salad/veg planters than in the Quadgrows. I don't know if this was because the peppers/aubergines did not like being grown next to tomatoes and cucumbers (i.e. in the same Quadgrow) or whether they just preferred closer planting with their own kind in a salad/veg planter. Aubergines and peppers (chilli & sweet/bell) seemed happy to grow together.

In the next post, I'll discuss preparing and setting up the Quadgrow.


Pest Control in a Wildlife-Friendly Organic Garden

 It can be disheartening to see your ripe strawberries half-eaten, your green lettuces reduced to a barely-recognizable stump, your potatoes hollowed out by underground miners, and your spinach leaves riddled with small and large teeth-marked holes. While you could reach for those bottles of agrochemicals, carefully laid out at the garden centre (you can smell them from quite a distance), there is an alternative way. Gardening organically will encourage wildlife into your green space and help you keep the pest population under control.

The Organic Gardener has several tools in her or his toolbox:

Prevent pests entering the garden

This basically means knowing where your plants and growing media come from. Buying from an established commercial nursery/garden centre should be fine. Buying a plant, donated by persons or persons unknown, at the local village fete is higher risk but may still be worthwhile. Growing from seed is probably the safest but healthy-looking plants should be fine. I would always recommend using certified seed potatoes, rather than a bag of potatoes bought at the supermarket, because this vegetable is susceptible to more than its fair share of pests and diseases that will live in the soil for many seasons. Slightly contrary to this advice, planting garlic cloves bought from a supermarket is relatively low risk because garlic comes equipped with its own pest control.

I'm sure I don't need to remind everyone that it was, essentially, poor monitoring and control of imported trees that led to the extremely serious Ash dieback fungal disease that is now devastating the UK tree population. This was not the first imported disaster and will not be the last.

I don't use animal manure to fertilize the garden because I prefer to make my own plant-based compost. If you want to use manure beware that it can contain a whole suite of weed seeds - some of which are difficult to get rid of once they've established themselves in the garden - and there can also be a problem with weedkiller chemicals in manure. Manure from ruminants (cows, sheep) is likely to contain fewer seeds (c.f. horse manure) and hot composting will reduce the weed seed population to acceptable levels. So make sure you know where the manure has come from and how it has been processed unless you are going to hot compost it yourself.

Barrier Defences

Hosta Halo - Slug Barrier

Here we are talking about physical barriers placed between the pest and the plant. The Hosta Halo (aka Slug Collar) is a good example - its shape makes it difficult for the slug/snail to cross and I find then very effective. Various other slug barriers are available or can be prepared at home (e.g. copper tape, strawberry mats, sheep's wool, egg shells, wood ashes, coffee grounds, diatomaceous earth). I think it is difficult to beat the Hosta Haloes for value as they will last many years (mine are 10 years old and still working!) and can be moved on to protect another plant once the first plant has grown sufficiently to be able to resist a slug attack. Maybe different colours (especially brown) would be useful if you want to hide them in the flower garden.

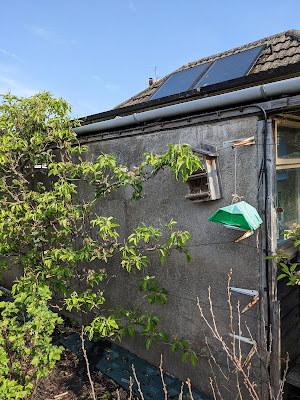
Here garden fleece is used to protect my strawberry crop...

Before

...from hungry birds, especially blackbirds. Without protection, I could easily lose half my crop. The fleece is held on by strong bulldog clips (easy removal for watering, feeding and picking) and can be dispensed with once cropping has finished...


After


Garden fleece finds many protective uses in the kitchen garden. It can be used as frost protection but here it offers barrier protection against onion fly...

Fleece Barrier against Onion Fly

 A similar system can be used against carrot fly but this is not a crop I usually grow as they don't do particularly well in my soil.

Fruit/vegetable cages are another form of barrier protection. The netting comes in a variety of mesh sizes depending on the type of protection needed. I use a butterfly-proof size to protect my brassicas from the cabbage white butterflies and pigeons. Also my climbing french beans/mangetout need early protection from birds as they enjoy the young flower buds and retard the crop - the netting is raised or removed once the plants are well-established).

Fruit/Vegetable Cages

Other forms of barrier protection are available on an 'as needed' basis: for example, brassica collars to protect against cabbage root fly, rabbit/deer fencing, ultrasonic devices to deter moles, cats, dogs.

Glue bands  offer barrier protection for fruit trees to deny crawling insects (winter moths, ants, vineweevil, earwigs, etc) access to the upper parts of the tree...

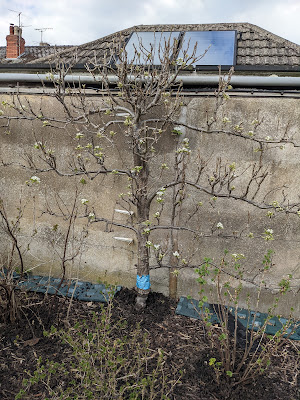
Glue Band Protection on Pear Tree

   
Finally, don't forget the virtual barrier of crop rotation, especially in the kitchen garden. This helps prevent the build-up of crop-specific pests and diseases in the soil. Usually a 3- or 4-year rotation system is employed - I use the latter. On a similar note, try not to replant perennials (mainly fruit in the kitchen garden) in the same location if possible - although this is tricky for small town gardens with limited space.

Encouraging Friendly Wildlife into the Garden

While, clearly, certain wildlife (i.e. pests and diseases) is not welcome in the garden, you might want to invite other forms of wildlife to enjoy the garden with you. Not only does this make life infinitely more interesting but it can also help you control some of those pests and diseases feasting on your crops and flowers.

The simplest and easiest way to do this is to put up a bird feeder...

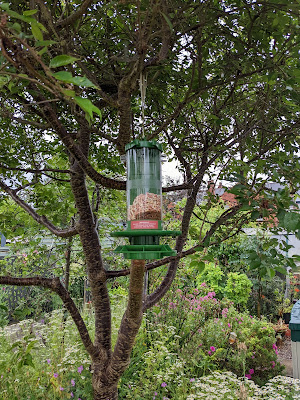
Finches Friend Bird Feeder

...there is a huge variety to choose from to provide our feathered friends with seed, mealworms, peanuts, etc. Do not put out bread as this is neither nutritious nor healthy for the birds. We have recently invested in a Finches Friend bird feeder which has a capacity of nearly 3 litres and an easily removable feeder station for cleaning; it comes with a spare feeder station so the birds do not have to interupt their feeding! It is on the expensive side but will hopefully last for many years. So far, it has proved very popular with the smaller birds: robin, blue tit, great tit and sparrows are regular visitors. The easy cleaning part is important because diseases such as Trichomonosis are devastating some bird populations. Whatever bird feeder you use, make sure it is regularly cleaned, disinfected (& rinsed) and dried; say, once a week.

Why do we invite birds into the garden? Because they like to eat a variety of insects, some of which you would classify as pests. We have a resident sparrow commune that lives in the ivy hedge you can just see in the photo below...

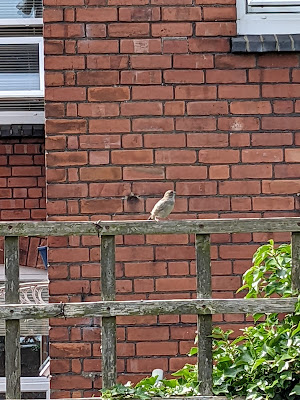
One of many local sparrows


The sparrows are very efficient at controlling the local aphid population. Other birds will happily eat caterpillars, slugs, snails, grubs and other pests. There is a downside because the birds will also happily gorge on your strawberries and cherries which is why you need barrier protection (see above) when these fruits are ripening. To attract blackbirds and robins, just leave a bare patch of earth - it helps to dig it over occasionally - where they can hunt for worms, beetles, and grubs.

If you have room for a pond, no matter how small, you may be able to encourage frogs & toads to take up residence. These amphibians eat snails and slugs, woodlice, beetles and bugs - toads have a fondness for ants, apparently.

You can also entice wildlife into the garden by providing food (e.g. flowers to attract bees, butterflies and insects) and shelter (hedgehog houses, bee/lacewing/insect hotels). Make sure your garden allows access for mammals such as hedgehogs and they will repay you by eating your slugs and snails while you sleep in your bed.

Leave a wild area containing wood piles, leaf litter, weeds, and bare soil to attract everything from worms and insects to birds and mammals. Not everywhere in the garden needs to be tidy!

Of course, it goes without saying you should avoid using pesticides and herbicides, including metaldehyde slug pellets, as these are definitely wildlife-unfriendly.

Biological Control

This form of pest control has exploded in recent times as more and more products aimed at specific pests have been made available to the amateur gardener. I use Nemaslug twice a year to keep the slug/snail population in check during the critical time when vegetable plants are getting established (late Spring/early Summer).

Biological methods can be quite expensive so you need to target application to the most troublesome pests. I have very limited experience of their use apart from the use of Nemaslug. Vine weevil is a particular problem we have with our container plants. I have tried the nematode route but I cannot confirm unequivocally that it was successful (unlike Nemaslug) - it certainly did not eradicate them but it may have reduced their numbers.

To control codling moth (apples and pears) and plum fruit moth in the orchard, I use sticky traps baited with pheromones...

Codling Moth Trap

Two 'applications' are needed to cover the critical May, June & July period when protection is needed.

Under this heading, you could include sacrificial  and companion plants; the former draws pests/diseases away from your favoured plants (i.e. sacrifices itself for the good of the favoured plant) while the latter confers some benefit to the favoured plant (e.g. by improving its vigour, sacrificing itself or detering pests).

Catching and Disposing of Pests

Probably not everyone's cup of tea but physically catching and disposing of the little critters is an option for certain pests.

Slugs and snails are easy to spot and catch - you can use a trowel or wear gloves if the thought of touching them is unpleasant - and this can be done while you are doing other things in the garden. Some people suggest going on nighttime searches with a torch - generally, I have better things to do with my time!

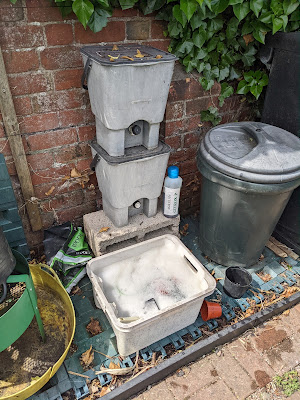
We dispose of our catch in our hot composter bins - the 60 ℃ temperatures make short shrift of them. It may be an urban myth that slugs and snails have a homing instinct so just throwing them into your neighbours' garden may not work and is certainly not neighbourly. Crushing underfoot may be the quickest form of death but it does leave a mess and the residue is surprisingly slippy so be careful you don't slip. Other suggested disposal routes include hot or salty water.

One step away from actually capturing the slugs/snails yourself is to use slug traps filled with some liquid attractant (such as beer or commercial baits) in which the slugs/snails drown (or do they?). There are some opposing views on how effective slug traps are, whether they attract all slug-types, what is the best attractant and how the slug actually dies. Cheap and easy (albeit a little messy to dispose of) and of doubtful efficacy. Some slugs are attracted and die in the traps but some slugs just have a drink and move on (a sort of sluggish pub crawl).

The only other pests we routinely 'catch' are lily beetles and vine weevil grubs (when emptying/repotting containers). These are disposed of underfoot or added to the hot composter bins. A jet of water applied from a hosepipe or pressurized sprayer will dislodge blackfly on broad beans and prevent them overwhelming the bean plant - no catching or disposal in this case!

Wildlife-Friendly Chemical Control

Use of chemicals, even environmentally-friendly chemicals, should be always be a last resort. Nevertheless, there are times when they do need to be used. First and foremost, wash and sterilize pots, trays and equipment to prevent passing on pest and diseases.

For pots and trays, I set up a temporary washing station to remove excess soil with a hosepipe...

Wash Station


...the waste water is used in the garden - usually on the nearby fruit and pear trees. The washed pots are then taken to the temporary disinfectant station...

Disinfectant Station


...where they are scrubbed and soaked (for at least 30 minutes) in a 1:150 solution of Citrox P before drying and storage. Tools and other items can be similarly treated or sprayed with the dilute Citrox P solution.

I always have a bottle of ferrous sulfate pellets or spray (Grazers Slugs & Snails) to hand to deter slugs when Hosta Haloes and/or Nemaslug treatment is not available or impractical. These slug pellets are non-toxic to other animals and just as effective as the old metaldehyde ones which are now banned.

Last year I bought a bottle of Grazer's Red Lily Beetle spray. Combined with search and destroy, this does seem to have reduced numbers this year although I cannot say whether either or both options were responsible.

For pest and diseases in the garden such as whitefly, aphids, wooly aphids, mealy bug and fungal diseases such as mildew, I use SB Invigorator concentrate made up into a spray. This is an effective if temporary means of pest/disease control so regular application is needed. Basically, if you have an infestation, this is a reasonable choice for a first attempt.

The final 'chemical' intervention in my arsenal, are garlic greenhouse candles. I fumigate the polytunnel and greenhouse in winter/early spring to clear out any unwanted pests. They can even be used when the greenhouse is full of plants, unlike their sulfur-based predecessors, should you be unfortunate to suffer a severe infestation of red spder mite, whitefly, aphids or other pests during the growing season.

This post has turned out to be much longer than I expected but hopefully will be of some use. If I have forgotten something, I will add it at a later date.


Popular Posts

Blog Archive